

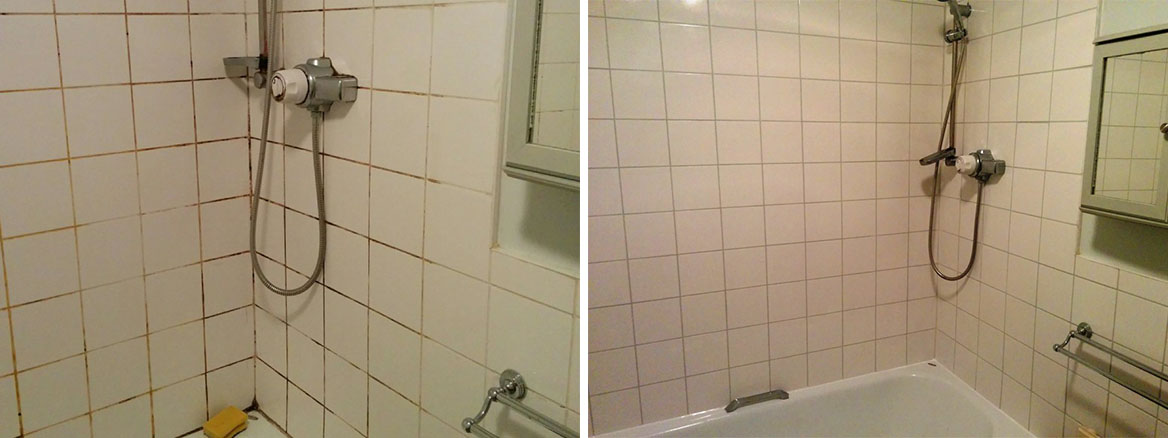
Stained Encaustic Shower Tiles Renovated in Forest Hill SE23
The client had recently moved into this property in Forest Hill SE23 and the previous owner had used a professional cleaning company to give the house a thorough clean prior to moving out. Unfortunately, they had used an aggressive acid based cleaner on the reclaimed encaustic tiles around the shower, causing white staining. I was contacted to see if it was possible to remove the stains and correctly seal the tiles to protect them.

I was pleased to tell them it was indeed possible to restore the tiles and we discussed how I would do this. I gave them my quote which they accepted, and we arranged a mutually convenient time to carry out the work. Encaustic tiles are quite unusual they were traditionally made from clay, but today, most modern versions of the tile are made using cement and are often referred to simply as cement tiles.
Cleaning and Restoring an Encaustic Tiled Shower
The first step was to scrub the tiles with a dilution of Tile Doctor Pro-Clean, an alkaline cleaner that is safe to use on Encaustics. The solution was scrubbed into the tile to ensure any remaining soap scum and surface grime was removed. Once done the tiles were rinsed off with water and I moved onto the next of renovating the appearance of the tiles with a set of handheld burnishing pads.
These pads are made from industrial diamonds that clean and remove scratches renovating the surface and closing the pores of the stone. For general cleaning and honing I would normally start with a 400-grit, but with the staining on these tiles, I started with the 200-grit. Once I had gone over all the tiles with the 200-grit pad with water, I then repeated the process with the 400, 800 and 1500 and 3000 pads in sequence. The tiles were rinsed off after each pad and finally left to dry.
Sealing an Encaustic Tiled Shower
Once the tiles had dried it was time to apply a sealer that would further enhance their appearance and protect them. For this I chose to use Tile Doctor Colour Grow as it’s an impregnating, colour enhancing product. It works by soaking into the pores of the tile where dirt can collect, thus protecting it from within.
The sealer was applied thinly with a cloth to all the tiles and allowed to dry for 30 minutes before the next coat was applied. Due to the porosity of these tiles, I applied four coats until I was satisfied, they were fully sealed. Once the tiles were dry, I buffed them with a dry 3000 burnishing pad to leave them with an appealing satin sheen.

The client was pleased with the result and I explained the best way to clean and maintain the tiles for the future would be to use Tile Doctor Aqua-Pro which is designed for use in bathrooms and gentle enough to use every day. They needed to avoid using strong household cleaners on these tiles otherwise the same issue would occur.
Professional Renovation of Encaustic Shower Tiling in Kent
Deep Cleaning Bathroom Tile & Grout in Beckenham
Recently I was asked to renovate the tile and grout of this windowless bathroom in a Beckenham flat which was not looking its best. The Ceramic tiles had become dull due to a build up of Limescale and the grout had become stained from shampoo dyes and mould.


Deep Cleaning Bathroom Tile and Grout
My first action was to apply a liberal amount of Tile Dr Oxy-Gel which is a strong alkaline tile and grout cleaning product that comes in a gel form. Being a gel it’s able to sticks to vertical surfaces for longer allowing it to break down the Limescale and soap residue that had taken up residence. Once it had been left to dwell for around thirty minutes, it was scrubbed off with water and a pan scrapper and then dried with a micro cloth. You can use this process with glazed ceramic tiles like these but for natural stone I would have used a different approach.
I then sprayed Tile Doctor Duo Clean, which is a grout cleaner and mould remover, onto the grout lines. I left the grout with the Duo Clean on it for about ten minutes before scrubbing and rinsing off with water.
The process was repeated where needed until I was happy that the tile and grout were as clean as possible however to really give the bathroom a fresh look I decided to completely renovate the grout with the application of a Grout Colourant.
Grout Colouring Bathroom Wall Tiles
There are ten colours to choose from in the Tile Doctor range of Grout Colourant’s and in this case I felt the best outcome would be to use a White colourant to match the tiles and restore the original look of the bathroom; the customer however wanted a grout colour that would provide a contrast against the white tiles, so in the end we opted for a light grey colour.
The colourant is easily applied directly to the grout and in this case I waited for the tiles to dry before applying two coats with the aid of a small brush making sure to remove any excess that comes into contact with the tile.
I finished the renovation by cutting out the original mastic sealant from around the bath and replacing with a new mould resistant silicone in white to match the bathtub.

Bathroom Tile Renovation in Kent
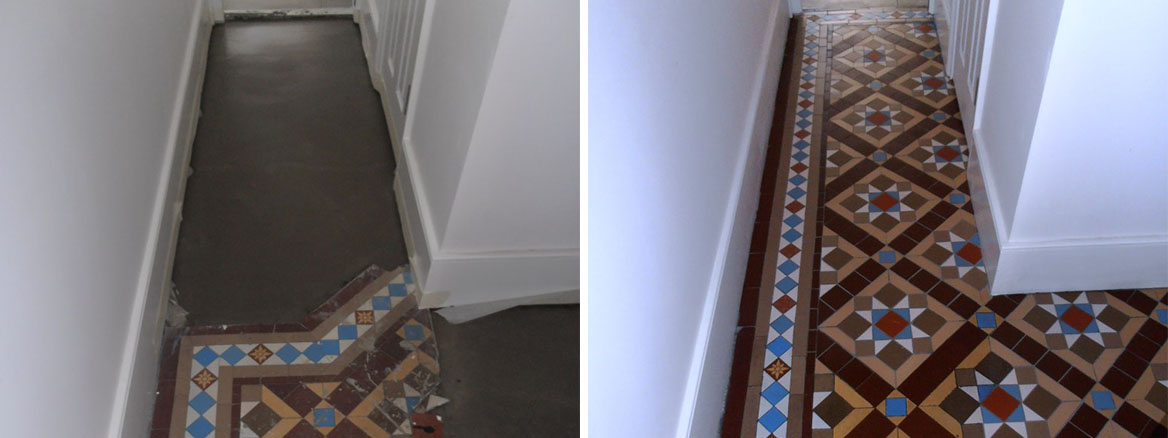
Original Victorian Tiled Hallway Extended and Refreshed in Sevenoaks
This customer has recently purchased a house in Sevenoaks and was looking to extend and reconfigure the interior layout. As part of this, they had removed a wall, effectively extending the hallway which had been tiled in fantastic original Victorian tiles. Naturally, they felt the extended hallway should look the same and wanted the Victorian tiles extending into this new area with matching tiles.


Cleaning a Dirty Victorian Tiled Hallway
To clean the floor, I applied several different products. When cleaning Victorian tiles, I usually start by applying our heavy duty cleaner known as Tile Doctor Remove and Go because it is particularly effective at breaking down grime that has been built up on these tiles over many years, and as its name suggests strips away any old sealer. This is left to dwell on the tile for ten to fifteen minutes before being scrubbed in with a black scrubbing pad fitted to a rotary floor buffer.
Once the cleaning slurry from the Remove and Go had been vacuumed up and cleared completely from the area, I then applied a strong solution of Tile Doctor Pro Clean, a high alkaline cleaner which helps to get deep into the stone to eliminate ingrained dir and staining.
I finished the deep cleaning process by applying a solution of Tile Doctor Grout Clean Up, which is an acid-based cleaner that is good for removing grout haze and other mineral deposits such as effloresce. After diluting it with water, I used it to rinse the floor, neutralising any efflorescence and limescale. It also assisted in opening the pores in the clay based tiles to get them ready for an impregnating sealer.
Laying a Victorian Tiled Hallway
The next step was to extended the hallway using reproduction tiles which I had sourced to match the existing Victorian pattern. There were also a couple of areas where the existing tiles need replacing. Rebuilding Victorian tiled floors is quite a common request for Tile Doctor so over the years we have built up a good list of suppliers and often source tiles from ebay that we keep in stock in case someone needs them.
Sealing a Victorian Tiled Hallway
One the new tiles were laid and the grout had gone off I returned to complete the project by sealing the whole floor with a couple of coats of Tile Doctor Colour Grow, a colour-enhancing impregnating sealer that leaves the floor richer in colour while retaining the natural looking matte finish requested by the customer.


Professional Victorian Tiled Hallway Restoration and Extension in Sevenoaks

Slate Tiled Wet Room Treated for Grout Haze and Restored in Sevenoaks
A builder had made a real mess of this customer’s new Slate tiled wet room. When installing any new natural stone tiles, it is always recommended to apply the sealer before grouting, since – as was the case here – the porosity of the stone can cause the grout to stick with to the stone, leaving a terrible blotchy and uneven appearance.


Restoring the appearance of a Slate Tiled Wet Room
To begin, I had to tape up all the chrome and metal fittings found around the bathroom to stop them coming into contact with the cleaning products. I them started the restoration by applying Tile Doctor Acid Gel, which is a PH1 blend of Phosphoric and Hydrochloric acids for the removal of grout haze.
As it comes in a gel form, this product is especially effective on vertical or sloped surfaces, where more dwell time is required. A liquid product would, of course, simply run off the tiles. So, working on small areas at a time, I allowed the gel to dwell for around five minutes, before agitating the solution with a pan scrubber, and rinsing the gel off with water. Once I had completed this process on the whole of the wet room, I allowed the tiles to dry out before repeating the process on some of the areas suffering from thicker smears of grout.
Sealing Slate Wet Room Tiles
When I was happy that I had removed all of the grout smears, I ensured that all the tiles were dry before applying Tile Doctor Stone Oil. This product is an easy-to-apply, pre-polish impregnating sealer which is ideal for low porosity stone and also suitable for more porous stone, such as Terracotta. It is also specially designed to enhance the natural colours and textures of tiles, and improve mechanical strength once cured. The oil is particularly effective when used on dark stone, like this Slate, as it really helps to deepen the colour.
I returned the next day to seal the tiles completely using one coat of Tile Doctor Ultra Seal to lock in the Stone Oil applied the previous day. Ultra Seal is a premium, no-sheen, natural-look, solvent-based penetrating sealer formulated to provide maximum stain protection. It allows moisture vapour transmission and is an excellent grout sealer.


Professional Slate Tile Restoration in a Kent Wet Room
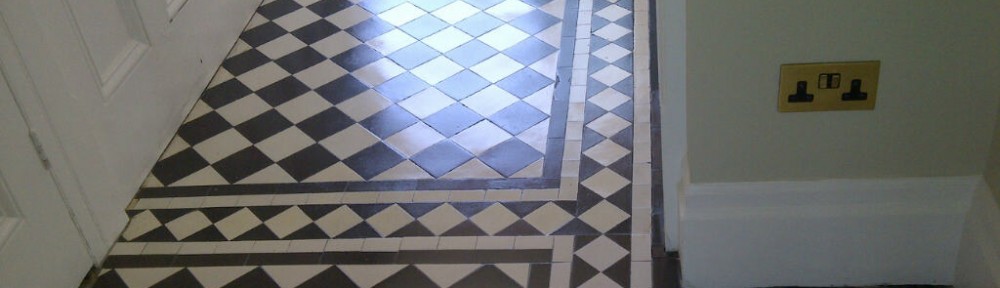
Rebuilt Victorian Tiled Hallway Cleaned and Sealed in Bromley
Not too long ago I was called to the large town of Bromley, where my client was in the process of renovating an Edwardian house. The house has a fascinating original geometric Victorian tiled hallway which had previously been covered in carpet which my client now wanted restoring and extending.
Before beginning my work I had an initial consultation with the client and liaised with the builder. It was agreed that the existing floor joints would be strengthened and the current floorboards would be replaced with ply sheets, allowing for the area to be fitted with new Victorian tiles, ensuring that these were consistent with the original design.

Restoring a Victorian tiled hallway
The first task was to clean the original tiles so that they would blend in with the fresh, new tiles. To do this I mixed a solution of three parts Tile Doctor Pro-Clean (a high alkaline cleaner) to one part clean water, combined with a small quantity of NanoTech HBU. NanoTech HBU is a penetrating cleaner which uses nano-sized particles to reach areas other cleaners simply can’t in order to lift out difficult stains and ingrained dirt.
This solution was washed over the floor, and was left to dwell for five minutes. I then used my rotary machine with a black pad to agitate and work the solution into the dirty tiles. After completing this initial clean I used a wet-vac machine to hoover up the resulting residue.
There was also some glue residue around the edges of the floor from where carpet grippers had been placed years before. To remove this I used Tile Doctor Remove & Go, which breaks down adhesives, waxes and old sealers. I covered the treated area with plastic to prevent it from drying out, before leaving it to sit for a couple of hours. Once the product had begun to break down the glue I then agitated it with a scrubbing pad to remove the residue. The area was then cleaned with the Pro-Clean/NanoTech HBU solution.
Tiling with Victorian floor tiles
Once the old floor was clean I started laying down the new floor using a matching set of tiles I had managed to source. Victorian tile designs are still very popular so many of the original designs can still be found being made today.
 |
 |
Once the tiles had been stuck to the new hardboard I was able to give both floors a general clean with a weak dilution of Tile Doctor Pro-Clean to remove any dirt from tiling etc, this was followed by a rinse and the use of a wet vacuum to get the floor as dry as possible before sealing.

Sealing a Victorian tiled hallway
After leaving the house for more than 24 hours to allow the hallway to dry completely, I returned to seal the tiles. After inspecting the area to ensure no excess moisture remained, I applied five coats of Tile Doctor Seal & Go, a water-based topical sealer, to both the old and new tiles.
This gave the entire hallway a nice sheen finish (as you can see from the photographs), as well as a robust surface seal to protect the tiles from dirt and wear in the future.


Victorian tiled Hallway restored, rebuilt and extended in Kent

Reclaimed Quarry Tiles Patio Restoration in New Cross, SE London
This customer based in New Cross South East London had a significant problem with their patio. Their home is a period Victorian property so when choosing a stone for the patio, they bought reclaimed quarry tiles to marry up with the period of the house, and proceeded with their DIY project. Unfortunately they were not aware that quarry tiles are porous until sealed, and grout left on the tile and not wiped off immediately, will leave a grout haze or in this case stick to the tile altogether.


Cleaning Patio Quarry Tiles
Satisfied with the results of the test clean I proceeded to clean the rest of the floor. For this I used Tile doctor Grout Clean-Up which contains concentrated acid and is designed to penetrate below the surface to remove grout smears; this was diluted 1 to 1 with water which is a very strong mix. I sprayed the solution onto the tiles, working 1sqm at a time, leaving it to dwell on the tiles for a few minutes before scrubbing the tiles by hand with a rough pan cleaner. I then rinsed the area off with water and used my wet vac to remove the soiled solution. The strong mix had the desired effect on the Quarry tiles but it was necessary to go over the area again after spotting some of the worse stains the first application had missed. Happy with the result, I carried out this process across the rest of the patio, working 1 sqm at a time.
Sealing Kitchen Quarry Tiles
When I was finished the customer was very happy with the result, and now had a patio they could use. The customer was keen to carry on with their DIY project, and wanted to seal the patio themselves, so I advised them to use Tile Doctor Colour Grow, which is a colour intensifier and impregnated sealer; this will both protect and enhance the reclaimed quarry tile into the future.

Removing grout haze from reclaimed Quarry Tiles in London

Bathroom and Kitchen Tile Refresh in Greenhithe, Kent
This customer from Greenhithe, Kent contacted Tile Doctor to have the tiles in her bathroom refreshed; the tiles which were looking tired and poor ventilation had caused her grouting to go black. This is not uncommon in the UK due to the inclement weather and tighter building regulations designed to promote draught proofing and insulation leaving moisture trapped in the house.
Bathroom Tile and Grout Cleaning
I first started off by cleaning all the tiles down with a weak solution of Tile Doctor Pro-Clean which is a multi-purpose cleaning product; there wasn’t a large amount of grime on the tiles and just general wear and tear on the floor with Limescale and water marks on the wall tiles. I then set about cleaning up the blackened grout with a steam cleaner followed by Tile Doctor Grout Colourant Pre-Treat cleaner, an acid based cleaner that etches the grout in order for it to accept the grout colourant. After cleaning and etching the grout joints they were rinsed down with plenty of water to remove any trace of chemical and then dried them out to receive the grout colourant.
 |
 |
Removing Grout Haze from Quarry Tiles
The grouting to the wall tiling in the bathroom was white, and the customer wanted it looking the same only fresher, so white grout colourant was applied. The grouting to the kitchen floor was originally a sand colour, but the customer wanted something more contrasting this time, so natural grey was used. Once the grout colourant was applied, it was allowed to set for 30mins before the edges were cleaned up. I finished by renewing the mastic sealant around the edges of the bath.
 |
 |
The job took a day and as you can see from the photographs made a huge difference to the bathroom and kitchen, needless to say the customer was really happy with the end result.
Bathroom and Kitchen Tile and Grout Refresh

Cleaning and Removing Grout Haze from a Quarry Tiled floor in Kemsing, Kent
The attached pictures are of a Quarry Tiled floor in a kitchen and family room of a cottage in Kemsing, Kent. The cottage was undergoing a full renovation and extension, and the quarry tiled floor was recently installed, however it was not sealed prior to grouting, and a grey grout haze was now sitting across the whole floor. Quarry tiles are highly porous and if not sealed before grouting the grout sitting on the tile soaks in leaving the colour of the grout as a haze over the tile.

Cleaning Quarry Tiles
There had been a number of tradesmen working constantly on the premises so it was difficult to tell what was grout haze and what was builders mess so I the first job was to give the floor a good clean. For this I used a strong mixture of Tile Doctor Pro-Clean diluted with water in a 3:1 ratio. I also added a squirt of Tile Doctor NanoTech Ultra-Clean which is an abrasive clean cleaner and processed to apply the solution to the floor. I left the solution to dwell on the floor for a short while and then scrubbed the floor using my weighted floor scrubbing machine fitted with a black 17inch scrubbing pad. The cleaning residue was removed using a wet vacuum and we could now see all the grout haze quite clearly.

Removing Grout Haze from Quarry Tiles
To remove the grout haze one part Tile Doctor Grout Clean-up was mixed with three parts water and poured into a spray bottle; Grout Clean-up is a product specifically designed for removing grout haze. This was then sprayed onto the floor, covering an area of around 1m2 and spread so it covered the grout haze evenly. This was allowed to dwell on the tile for three to four minutes before I agitated the solution by hand with a pan scrubber and water. This was then vacuumed up before I took a scrubbing brush and clean water from another bucket and scrubbed the area, before again vacuuming up. This ensured that all the formula had been cleansed from the floor; this process was repeated across the whole floor, working on 1m2 at a time and then left to dry ready for sealing.

Sealing Quarry Tiles
The floor was now ready for sealing; Quarry tile floors can accept two types of sealer, a topical sealer or an impregnated sealer. I usually recommend Tile Doctor Seal & Go for Quarry tiled floors which is a Topical sealer as it is easier to maintain. On this occasion however the customer wanted to wait until they had completed decorating and was happy to seal the floor themselves, so I gave them advice on what sealers to use and how best to use them and left them to it.
 |
 |
Grout Haze removal from Quarry Tiles in Kent

Tired Black Slate Tiled floor in Sevenoaks restored
The photographs below are of a black slate tiled floor in the kitchen and utility room of a house in Knatts Valley, Sevenoaks Kent, it was laid around six years ago when the kitchen was installed. The owner was now having the whole kitchen re-decorated and was considering laying a new floor as the current slate looked so tired and was difficult to clean.

Cleaning Black Slate Tiled Floor
Normally I would use a strong solution of Tile Doctor Pro-Clean solution mixed with Tile Doctor Nanotech Ultra-Clean and a floor buffing machine, but due to the deep riven nature of the slate, the floor would have to be scrubbed manually. The floor had been sealed originally and although old and broken there was still a lot of sealer on the floor which all had to be removed. I decided to use the blanket system, which involves a mixture of Tile Doctor Remove & Go mixed with Nanotech Ultra-Clean 70:30 mix. This mixture was applied to floor, and covered in plastic to prevent the solution from drying out. This was left on the floor for two hours, and then scrubbed off, you can just use a natural bristled scrubbing brush, but I find them cumbersome with the solution, so I opt for oversized pan scrubbers, which are pliable for getting into deep riven tiles. As the solution was scrubbed it was rinsed with water and removed with a wet vacuum. When everything was removed for from the floor and vacuumed up, I rinsed the floor again with water and vacuumed up to ensure all the solution had gone, the floor was then left for 48 hours to ensure it had fully dried out.

Sealing Black Slated Tiles
The slate floor was sealed using five coats of Tile Doctor Seal & Go, which despite being a low sheen finish, it really enhanced the colour of the black slate giving it more depth. The tiled floor was ready for light foot traffic in a few hours, achieving a full cure in 24 hours. The beauty of using a topical sealer such as Seal & Go on a riven stone is that the feel of the stone is smoother and therefore easier to mop. For everyday cleaning purposes we recommend Tile Doctor Neutral Cleaner, diluted 1:30 with water.
 |
 |
The customer was very pleased with the result and was pleased not to have to replace the floor.